Encrypt an existing Linux installation with LUKS and LVM
November 2016
An issue I encountered recently - how to encrypt an exisiting Xubuntu Setup. There are several ways to achieve this. I want to document my process I used.
I’m working with following assumptions:
- The Linux installation to be encrypted is the only OS on disk.
- The system is a (X)Ubuntu or similar (Debian). Commands, paths to config files or package names might differ in other Distributions.
- The system is EFI-enabled. This means there is a 512 MiB FAT partition at the beginning of the disk, containing the EFI loader. This partition has to remain untouched. If your system is using legacy boot, ignore instructions regarding EFI later on.
- A Live Linux USB stick (e.g. Xubuntu 16.10) and a separate hard disk with at least the same size as the system drive are available and ready. When in doubt, use a disk which is larger than the system drive.
- The entire process takes time.
- Mistakes happen. Be ready to lose data from the installed system! Ideally, there are multiple recent backups in place.
Before booting from the USB linux, prepare the Linux system by installing necessary packages & latest updates.
root@host:~# apt update; apt upgrade; apt install cryptsetup pv lvm2 gparted
Remove old kernel images. This might take a while, depending on the age of the Linux installation.
root@host:~# apt autoclean; apt autoremove
Shut down the computer, connect the USB disk and the second hard drive. Boot into the live system. Make sure your keyboard layout is set accordingly.
root@live:~# dpkg-reconfigure keyboard-configuration
Install necessary packages on the live system as well.
root@live:~# apt update; apt install cryptsetup pv lvm2 gparted
Annoyingly, my live system auto-mounted the old system disk. Unmount if necessary.
Use fdisk -l to check the order of drives. In my case, sda is the old system disk, sdb is the USB stick, sdc is the second hard drive. Use dd to copy the entire system disk to the second drive, with pv monitoring progress. Don’t overwrite your system.
root@live:~# dd if=/dev/sda | pv --progress --eta --bytes --rate | dd of=/dev/sdc
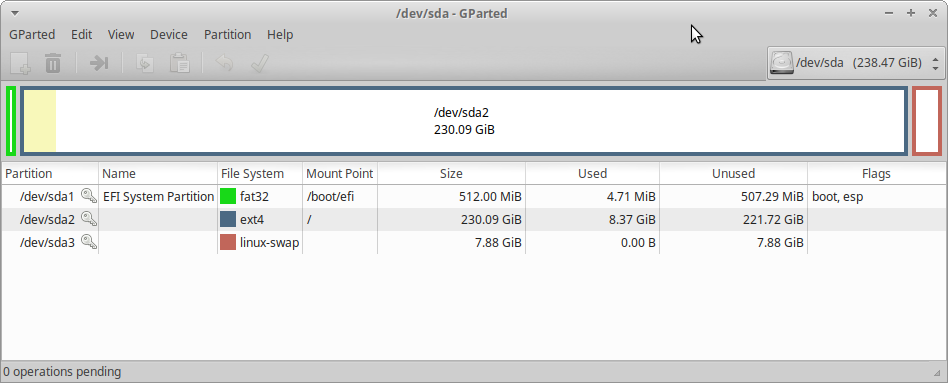
When finished, open gparted and choose your system disk.

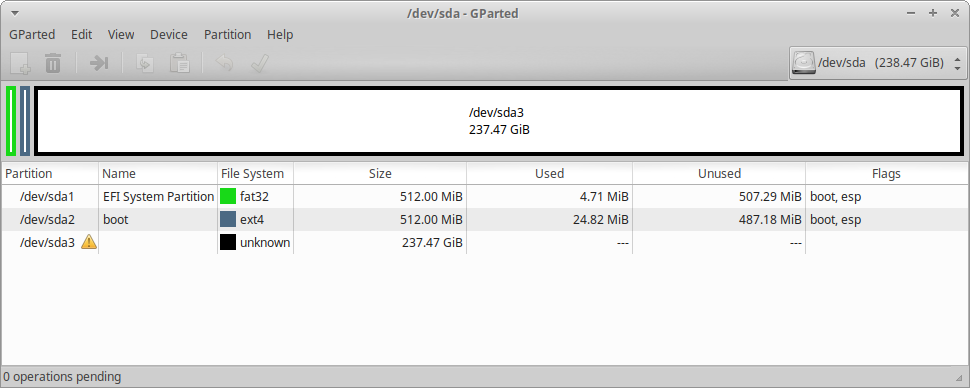
Delete the root and swap partition, create a new boot partition (512MiB, ext4, set boot / esp flags) and create a “cleared” partition from remaining available space. Leave the EFI partition untouched. Note: if there’s no EFI boot partition, format the entire disk and create partitions as described.
The result looks like this:

Consider secure erasing of the old system partition. It takes time, but leaves no trace of unencrypted data on the system drive.
root@live:~# cryptsetup open --type plain /dev/sda3 container --key-file /dev/urandom
Proceed to create the encrypted volume on the cleared partition and choose a strong password.
root@live:~# cryptsetup luksFormat -c aes-xts-plain64:sha512 -s 512 /dev/sda3
Open the encrypted volume.
root@live:~# cryptsetup luksOpen /dev/sda3 encrypted_system
Create a LVM volume group and logical volumes on top of the opened LUKS volume. Note: tempo is the name I chose. Feel free to use another name for the volume group, but keep it consistent.
root@live:~# pvcreate /dev/mapper/encrypted_system
root@live:~# vgcreate tempo /dev/mapper/encrypted_system
root@live:~# lvcreate -L 8G tempo -n swap
root@live:~# lvcreate -l 100%FREE tempo -n root
Set up the swap and root volume.
root@live:~# mkswap /dev/mapper/tempo-swap
root@live:~# mkfs.ext4 /dev/mapper/tempo-root
Mount the new root volume to /mnt.
root@live:~# mount /dev/mapper/tempo-root /mnt
Mount the old root partition, which has been copied to the second drive.
root@live:~# mount /dev/sdc3 /media/old_root/
Navigate to the old root directory and use tar to copy the root system to the new LVM volume. The command doesn’t compress file input but redirects it to stdout. The output is then piped to the 2nd command where tar reads it from stdin. This way, all file & system attributes are preserved.
root@live:~# cd /media/old_root/
root@live:~# tar cvf - . | tar xf - -C /mnt/
When finished, delete all contents from the boot directory, since this will be the mount point for the new boot partition. Use the piped tar command to copy contents from the second drive. Mount the EFI partiton as well.
root@live:~# rm -rf /mnt/boot/*
root@live:~# mount /dev/sda2 /mnt/boot
root@live:~# cd /media/old_root/boot/
root@live:~# tar cvf - . | tar xf - -C /mnt/boot/
root@live:~# mount /dev/sda1 /mnt/boot/efi
Get the UUID of the encrypted LUKS volume. We need this later on.
root@live:~# blkid /dev/sda3
/dev/sda3: UUID="0f348572-6937-410f-8e04-1b760d5d11fe" TYPE="crypto_LUKS" PARTUUID="85f58482-8b18-446a-8cb6-cfdfe30c7d55"
Prepare the new root system in /mnt for chroot.
root@live:~# for dir in /dev /dev/pts /proc /sys /run; do mount --bind $dir /mnt/$dir; done
root@live:~# chroot /mnt
In the chrooted environment, we need to create or edit several config files to tell Linux where to look for the LVM swap / root volumes and how to open them. Create /etc/crypttab with the name of the volume group (tempo in my case) and the LUKS UUID we got earlier.
#
encrypted_system  UUID=0f348572-6937-410f-8e04-1b760d5d11fe  none  luks,discard,lvm=tempo
Create a file named /etc/initramfs-tools/conf.d/cryptroot in the chrooted environment. Replace tempo with the name used to open the LUKS volume and the UUID of the LUKS partition.
CRYPTROOT=target=tempo-root,source=/dev/disk/by-uuid/0f348572-6937-410f-8e04-1b760d5d11fe
Run the follwing command in the chrooted environment. It should pass without issues.
root@live:~# update-initramfs -k all -c
Open /etc/default/grub in the chrooted environment. Find this line:
GRUB_CMDLINE_LINUX=""
Insert the appropriate values (volume group name, LUKS UUID):
GRUB_CMDLINE_LINUX="cryptops=target=tempo-root,source=/dev/disk/by-uuid/0f348572-6937-410f-8e04-1b760d5d11fe,lvm=tempo"
Update grub in the chrooted environment. It will read arguments from /etc/default/grub and create new boot entries.
root@live:~# update-grub
Open /etc/fstab in the chrooted environment. Update the entry for the encrypted root and swap volume. Use blkid to find the UUID of the new boot partition. Leave the EFI partition entry untouched. My new fstab looks like this:
UUID=2886e598-0d5c-4576-87e7-a234011e7725	/boot		ext4	defaults		0	2
UUID=E2F4-2888					/boot/efi	vfat	umask=0077		0	3
/dev/mapper/tempo-root				/		ext4	errors=remount-ro	0	1
/dev/mapper/tempo-swap				none		swap	sw			0	0
That’s it. Close the chrooted environment and shut down the computer. Remove the USB stick and second hard drive. A password prompt should appear during boot. If everything goes well, the newly encrypted system will boot. Check if all partitions are mounted accordingly. Reboot again to check if recovery mode is working as well. Note that you still have an exact copy of your system previous to encryption on the second hard drive. After verifying the encrypted system is working as intended, you might want to consider secure erasing secure erasing of the unencrypted disk.